INFORMATION ABOUT THE USE
- USEOF TINPLATED PRODUCTS
- USEOF NON-STICK PRODUCTS
- INSTRUCTIONfor setting up of the mantle for Springform pans with corrugated bottom
- INSTRUCTIONfor setting up of the mantle for square and rectangular springform pans
- INSTALLATIONinstruction of Ceiling cloth dryers with 5 rods.
- INSTALLATIONinstruction of Ceiling cloth dryers with 6 rods
- Product with Polish Health Quality Certificate.
- Designed for use in gas and electric ovens.
- Do not use in washing machines and microwave ovens.
- Made of electrolytic tinplate.
- Protect the tin surface before a direct contact with sour substances using for example paper or baking foil.
- Wash and dry after use.
- Additional recommendations when using Springform pans: In case if the products with jelly are made as cold, you should pour the gel mass into the Springform pan at the last phase of gelatinating i.e. if it comes to the thick consistency. To avoid fat outflow, you should use a baking paper.
- Additional recommendations when using baking tins and Springform pans with inserts: It is to recommend to use dough with the thick consistence, for example a yeast dough, a dough with a short bottom. Using a dough with the thinner consistence you should lay a baking paper onto the bottom of the baking tin/springform pan and bend it at external edges of the insert.
- We recommend using baking paper.
- Exercise extreme caution when removing from the oven, e.g. by using oven mitts.
- Product with Polish Health Quality Certificate.
- Designed for use in gas and electric ovens.
- Do not use in washing machines and microwave ovens.
- Product made of durable steel.
- The non-stick coating reduces adhesion and consequently make sit easier to remove the cake after baking and washing the dish is also easier.
- Before use wash, dry and cover the inner surface with fat.
- Do not use sharp utensils which can scratch the surface.
- Wash and dry after use.
- Avoid sudden, dramatic changes of temperatures.
- Additional recommendations when using Springform pans: In case if the products with jelly are made as cold, you should pour the gel mass into the Springform pan at the last phase of gelatinating i.e. if it comes to the thick consistency. To avoid fat outflow, you should use a baking paper.
- We recommend using baking paper.
- Exercise extreme caution when removing from the oven, e.g. by using oven mitts.
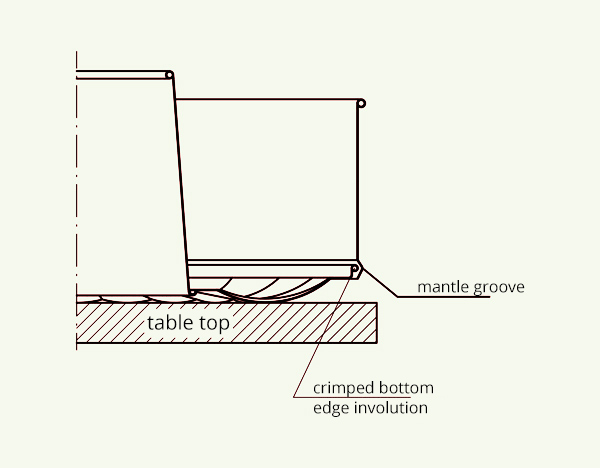
Metod of placing the mantle.
In order not to damage the springform pan when closing the corrugated bottom with a tube or the corrugated bottom without a tube you should lay down the mantle with the groove upside down onto the top, open the lock, put in the bottom, raise the mantle so that the bottom is brought into this groove and clamp the lock (see sketch).

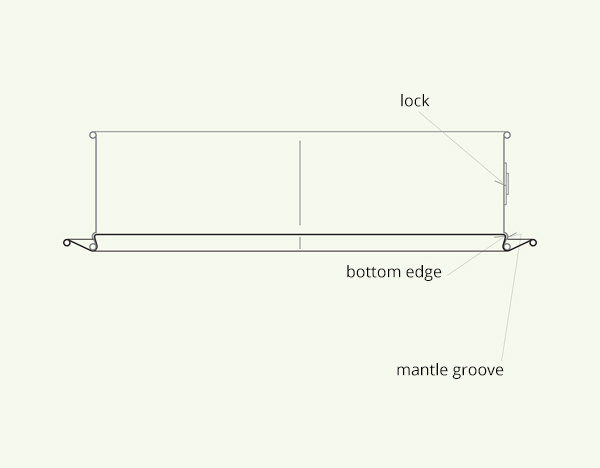
Metod of placing the mantle.
1.Place the bottom of the Springform pan onto the table surface as shown on the drawing.
2. Place the mantle with the edge with profiled groove downwards as show on the drawing.
3. Move the lock level into position perpendicular to the mantle.
4. Place the mantle into the groove of the bottom pressing tightening so that the mantle edges cling to the groove. Holding the mantle in this position close the lock.
This dryer can be mounted in the bathroom or on the balcony.
It consists of two plastic girders to be fastened to the ceiling with extension anchors and movable rods made of steel tubes covered with plastic and hanging on strings.
Individual rod position depends on string length determined by wall and wall hook.
Max. load of 1 rod is 2 kg.
Installation instruction:
- Fasten two girders to the ceiling using 4 expansion anchors for each girder; distance between anchors depends on rod length.
- Please remember that the ceiling girders should not be installed too close to the back and side walls.
- Fix the wall hook the wall.
- Lead-in the string into the girder slots and through the girder rollers.
- Fix two string holders enabling to set rods height.
This dryer can be mounted in the bathroom or on the balcony.
It consists of two plastic girders to be fastened to the ceiling with extension anchors and movable rods made of steel tubes covered with plastic and hanging on strings.
Individual rod position depends on string length determined by wall and wall hook.
Max. load of 1 rod is 2 kg.
Installation instruction:
- Fasten two girders to the ceiling using 3 expansion anchors for each girder; distance between anchors depends on rod length.
- Please remember that the ceiling girders should not be installed too close to the back and side walls.
- Fix the wall hook the wall.
- Lead-in the string into the girder slots and through the girder rollers.
- Fix two string holders enabling to set rods height.

